In this article, I will talk about Artificial Intelligence again. These days I’m super excited to explore AI, especially AI to produce art.
Maybe you will ask why, to know the answer just look at these arts
Also this one
Impressive, isn't it?
I you think that those arts are created by people, you are wrong, those are created by computers through Artificial Intelligence. Not completely wrong, though, that AI is created by people.
if you are curious about how to make it just continue reading.
One of the most well-known and capable AI tools for producing art is midjourney. Creating art using midjourney is super easy just follow these simple steps and you will be a master of art in no time.
Step 1 Join Midjourney Beta
Go to the Midjourney website, using the link below.
[embed]https://www.midjourney.com/home/[/embed]
And click “Join the beta”
From this step, you will be redirected to their discord invitation page.
Step 2 log into Discord
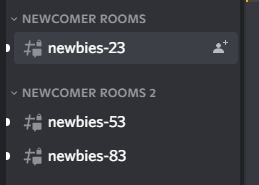
Log in with your Discord account, or create one if you don’t have any. Then you can join any one of the newbie’s channels that have a bot.
And now, ARE YOU READY TO CREATE A MASTERPIECE?? Then move to step 3
Step 3 Create a Masterpiece
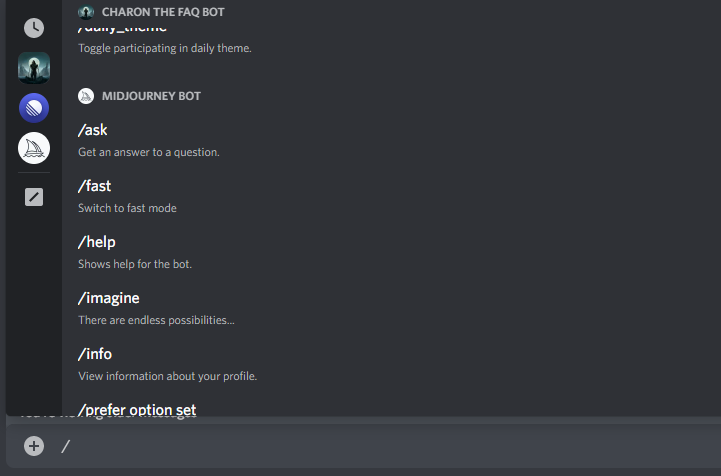
To create art, you can use the Discord slash command. Start typing /imagine, click /imagine option and it will generate a prompt. Type in the prompt anything you want the bot to generate.
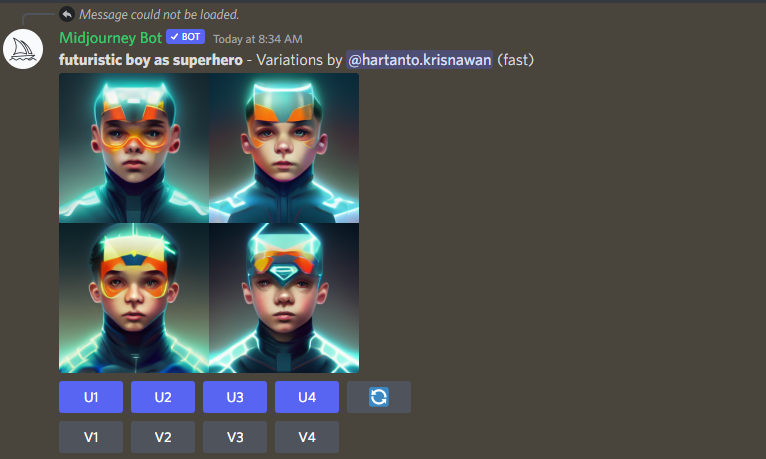
For example, I will type “futuristic boy as superhero” and then press enter.
Wait for the bot to finish generating the image based on the description you wrote.
It will take minutes to generate.
And Voila!! your art is ready freshly baked from the oven.
Four images are generated in 2X2 grids.
You also can upscale your chosen image by clicking U1 — U4 and ask for another variation by clicking V1 — V4.
Your 2X2 image and the upscaled version can be accessed at www.midjourney.com/app/ by login in using discord.
Keep in mind, for the free trial version there is a limit to the number of images generated. If you want to generate more images, you can purchase their subscription plan.
In this article I am really interested to share something that hype recently, that is: AI GENERATED ART. AI generated art or Artificial intelligence art refers to any artwork created through the use of artificial intelligence.
For this article I will try to create abstract art using python code from Abstract-Art-Generator.
Please follow these 4 Easy Steps:
Step 1
To get the code, you can clone or download from his github and save it in your local machine.
Step 2
Before you run this code, make sure to install all the requirements:
pygame
python -m pip install pygame
pygame_gui
python -m pip install pygame_gui
tkinter
python -m pip install tkinter
Step 3
After all requirements are fulfilled, run the python code using this script:
python art_generator.py
Wait until the UI is prompted.
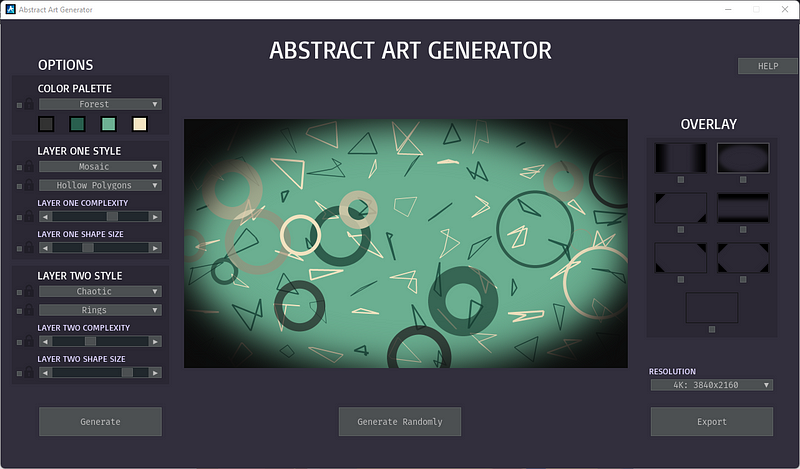
Abstract art generator
Step 4
You can generate abstract art randomly or custom it with your own preference.
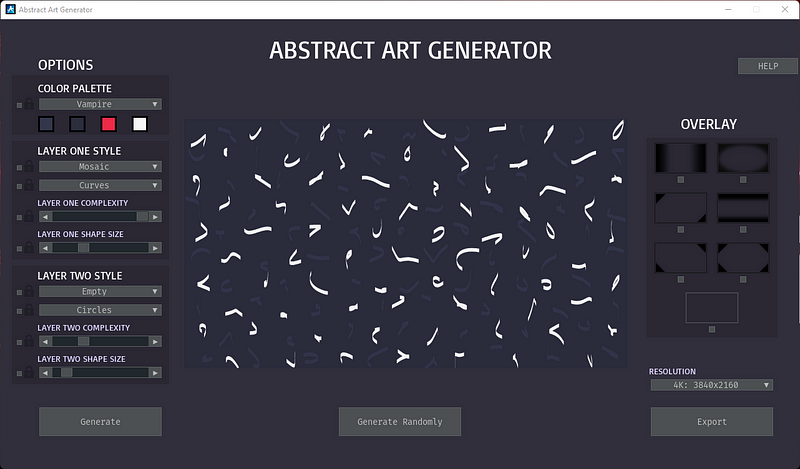
To generate randomly click “Generate Randomly” button.
Let’s try it:
Fig 1
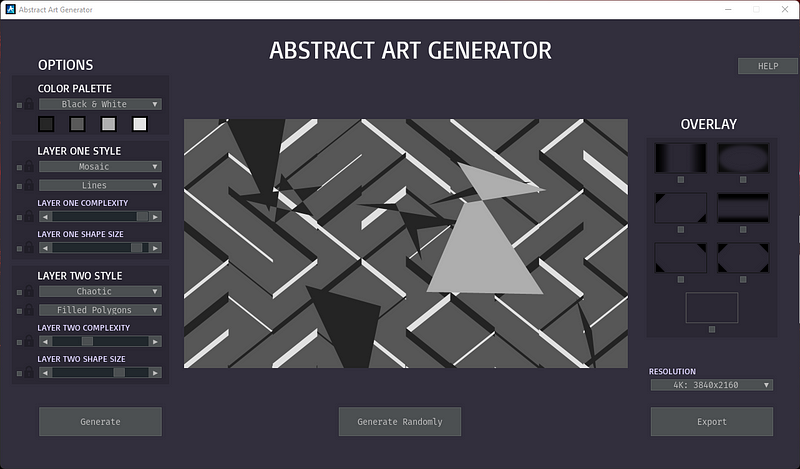
2. Fig 2
3. Fig 3
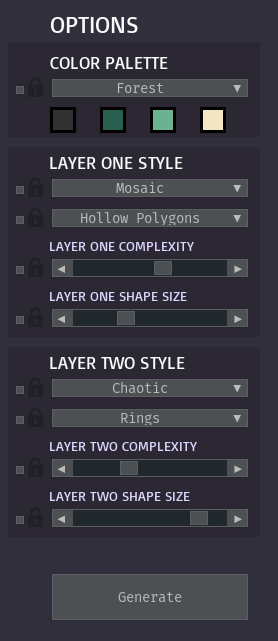
Or, you can customize it in OPTIONS tab.
Choose color palette
Styling layer one
Styling layer two
Generate
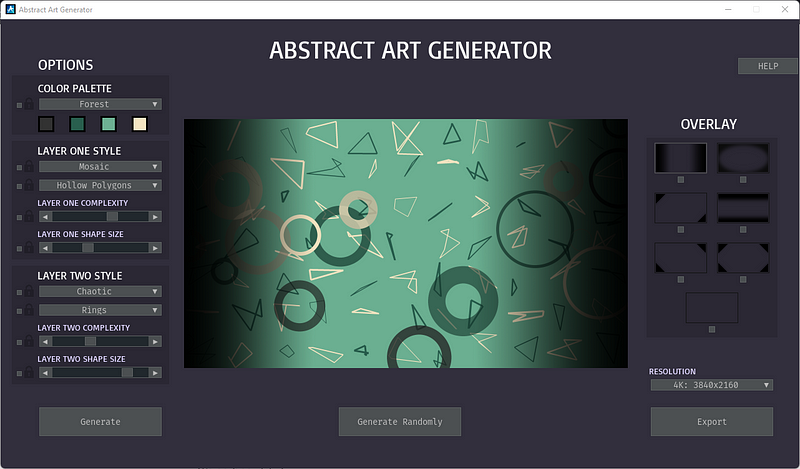
Let’s see the result
and
Voila!!!
It’s so beautiful.
You can also add overlay on top of it.
Don’t be afraid to experiment with other combination of shape and color, and create your ultimate masterpiece.
This article will show how to create basic End to End testing using Cypress.
What is End-to-End (E2E) Testing?
End-to-end testing, often abbreviated as E2E, is a testing technique that tests an entire product or an entire piece of software. This test is carried out from start to finish to ensure the application flow behaves as expected. E2E test can be interpreted in the abstract is to validate the workings of an application or website from the point of view of a user.
Automate End-to-End (E2E) Testing in Cypress
For this article’s simulation I will use dummy test automation website from books.toscrape.com. This site is good enough for practice purpose. It simulates e-commerce site so we can practice as if create automated testing for e-commerce website. To access the website, you can click the link below.
[embed]https://books.toscrape.com/[/embed]
Preparation
I’m assuming, you already installed the prerequisite software. In this tutorial I use:
Windows 11
Visual studio version 1.52.1
Node js v14.16.1
Cypress version 10.9.0
Of course you can use other version, but the details maybe slightly different.
Write the test
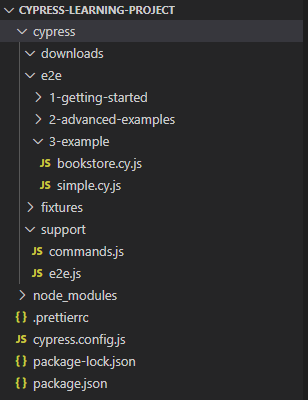
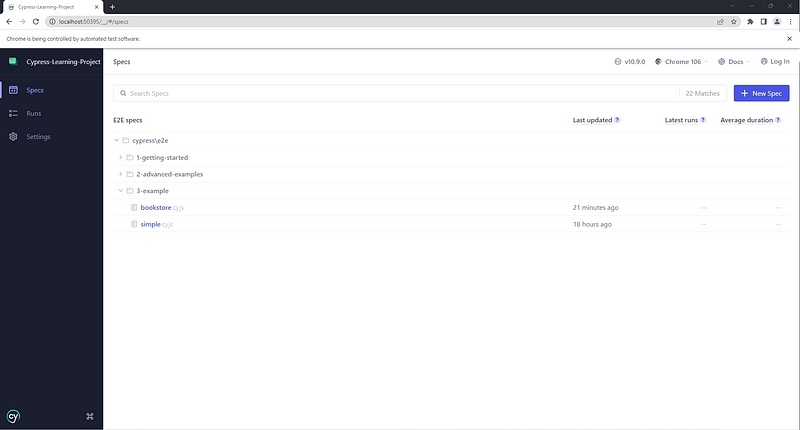
Now we are ready to create end to end test in Cypress. First create bookstore.cy.js file under folder “cypress/e2e/3-example”. My project structure is look like this.
Within the file, write the describe() function. Describe() function comes from mocha bundled library as cypress adopt mocha BDD syntax. It provides a way to keep tests easier to read and organized.
describe(‘Browser Actions’, () => {

})
In this test scenario I will divide the test into 3 segments: Visit the page, click a hyperlink, and verify an element.
Step 1: Visit the page and validate the url return
To visit a page, write down the code below within the describe() function.
it() is used for an individual test case. it() takes two arguments, a string naming our test, and a callback function which contains our actual test.
The code above can be broken-down into:
cy.visit(‘https://books.toscrape.com/', { timeout: 10000 }) will open page books.toscrape.com with 10 seconds timeout. cy.url().should(‘include’, ‘toscrape.com’) will verify the returned url should contain string “toscrape.com”.
Step 2: Click a hyperlink and validate the opened page
To visit a page, write down the code below under the previous it() function.
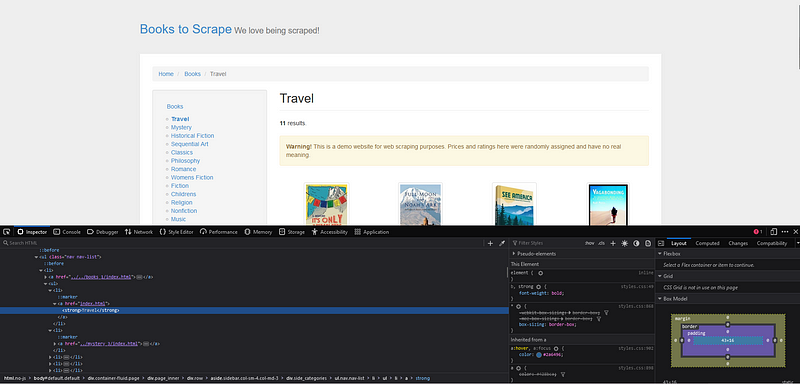
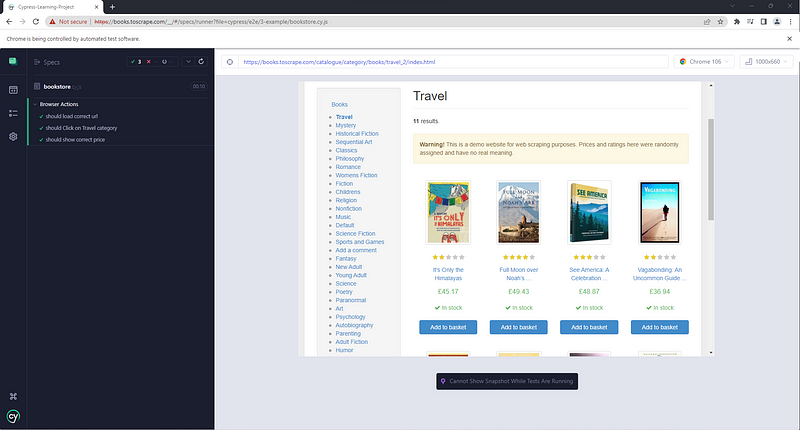
cy.get(‘a’).contains(‘Travel’).click() will inspect “a” html element and click an element that contains “Travel”. cy.get(‘h1’).contains(‘Travel’) will verify that the opened page contains string “Travel” as an h1.
To know where the element is located, we can open our web browser and open the page. After that, find it in inspect element. In this scenario string “Travel” is located in “a” element.
Step 3: Verify an elementin the opened page
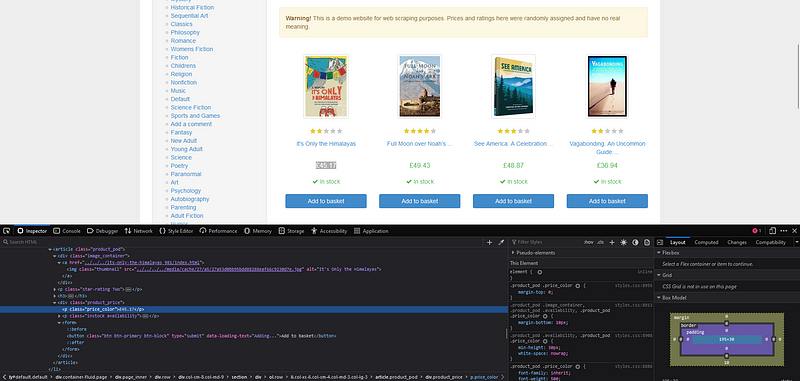
In this step I will add another assertion, which is make sure the first book contain correct price. Please write down the code below under the previous it() function.
The code above contain a method that will search an HTML class .product_pod then go down to class .product_price. We add . in front of class name but nothing in front of HTML element. After we get price element, make sure that the value is £45.17.
To know where the price is located exactly, you can find it in inspect element, like above.
After we write down the code, complete code will be looks like this:
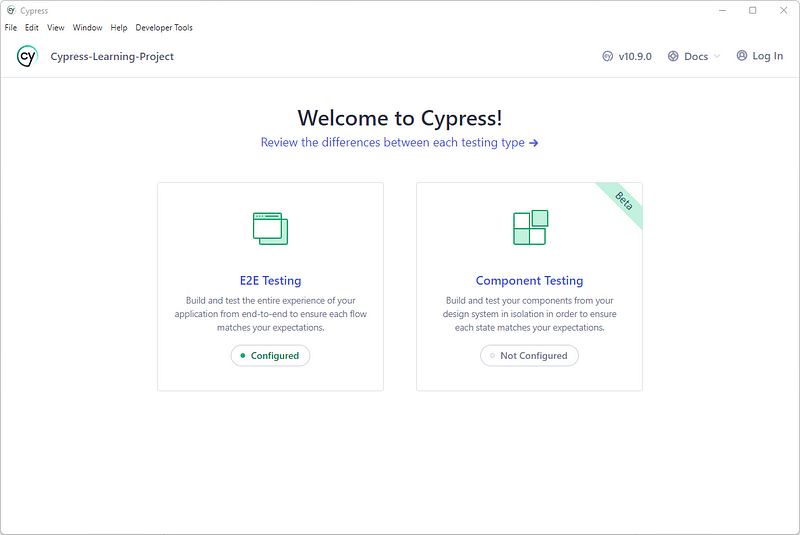
It will open Cypress Launchpad. The Launchpad offers two biggest decision first: What type of testing to do. E2E Testing, Which will run the whole application and open pages to test them. Or Component Testing, Which isolate individual component of application and test it.
Cypress Launchpad
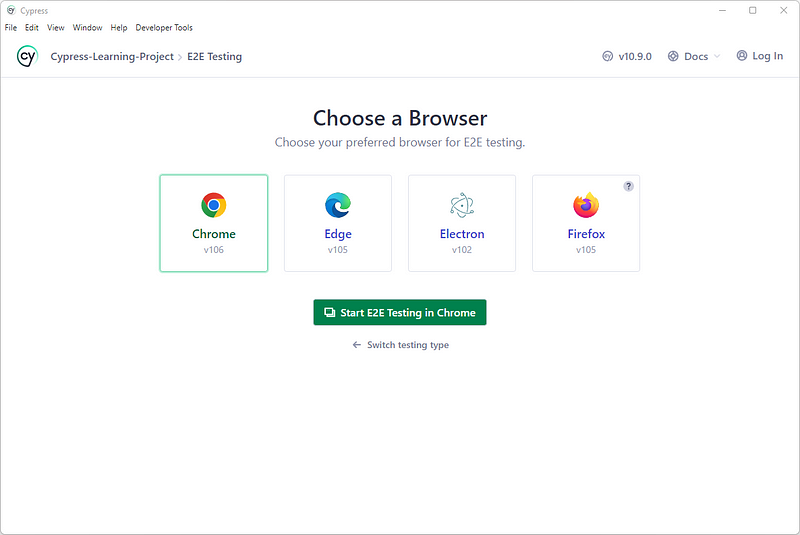
Launching a Browser
Lastly, Cypress will presents list of compatible browsers Cypress found on your system.
This time I will use Chrome, we can always change it later.
Run the test
Our test is located under E2E specs/3-example. Click bookstore.cy.js and wait until Cypress open books.toscrape.com.
As we can see right now, all the test is succeed.
All the test cases that I show you above are positive cases. You can also create scenario that covers negative cases.
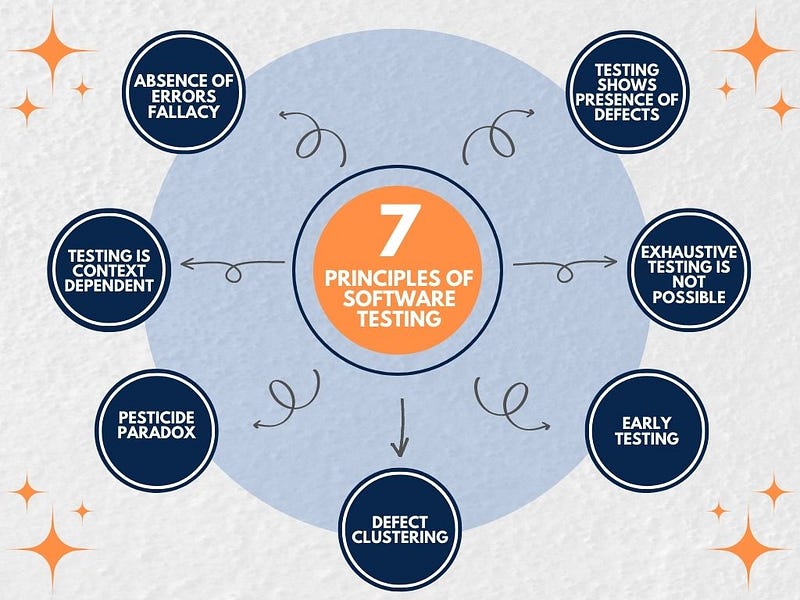
Software testing is an important activity. It provides certain level of confidence with the product. That level of confidence achieved through a series of testing activities. Software testing activities is a procedures that are executed to catch bugs, errors, defects as early as possible, ensure that the product meets acceptance criteria, and the completeness of specifications in accordance with business, user, and product requirements.
To run that procedures, we need to have a strategy, so our testing activities will not take too long time but still optimum enough to reach the goal.
How can we develop a good strategy? Or Base on what we develop that strategy? One of the rules that have been proven to be used as a basis for building strategy is 7 Principles Of Software Testing.
In this article, we’ll take a look at what is 7 Principles Of Software Testing and its component, one-by-one.
7 Principles Of Software Testing
1. Testing shows presence of defects
Presence of defects
The purpose of software testing is to reduce bugs occurrence in software using various methods and techniques. By doing series of testing procedures, it detect the presence of bugs or defects . Software testing can only ensure that bugs are present, not those that are absent. Even after we execute test endlessly, it is impossible to be sure that the software is completely bugs-free.
2. Exhaustive testing is not possible
Exhaustive testing
It is a practice of testing a software using all possible inputs and preconditions. It is very difficult to test all modules and their functionality with valid and invalid combinations of input data throughout the testing process.
Imagine an input field that accept age information, we need to execute test using 1, 2, 3, 4, 5, and so on. And don’t forget to also test it using invalid value, such as a-z, A-Z. It is a very time consuming procedure and very not cost effective.
3. Early testing
Early testing
Testing should start as early as possible so that any possible defect can be captured in early stage. It is less costly to fix defect in the beginning. But how early it should be performed? Once we get the requirement.
4. Defect clustering
Defect clustering
Defect clustering state that the most bugs will detected in a small number of modules. Usually it follows the Pareto 20/80 law. About 80% bugs will be found in about 20% of modules.
5. Pesticide paradox
Pesticide paradox
Imagine a farmer that are using the same type and doses of pesticide to spray bugs, again and again repetitively, eventually bugs will develop immunity to that kind of pesticide. The same thing happened to software testing. If the same methods and approaches are used repetitively, the method will be useless to catch a new bugs.
To overcome this, the test case needs to be evaluated and replaced periodically. Also, tester need to be more creative and run the test outside the test case.
6. Testing is context dependent
Context dependent
Software testing is not a one-for-all scenarios. It is important to design tests based on the context of software development. Different strategies, methods, and kinds of testing are utilized relying upon the idea of an application. For example, software for the aviation industry requires more detailed, thorough and thorough testing than the company’s website. And e-commerce page will require different test than login form.
7. Absence of errors fallacy
Absence of errors fallacy
Although software is 99% bug-free, it is still possible that the software cannot be used at all. It is still important that the software must be practical and able to accomplish the client’s requirements and needs.
Conclusion
Based on what we have learned together, 7 Principles Of Software Testing can help us gain greater efficiency, focus, and also improve our strategy for designing testing scenario.
One of the tasks of the software tester is to tell bug occurrences to the software developer. A bug is bad news. And just like other bad news, people tend to avoid it. Some people will feel uneasy if they hear that there is bad news in the code.
The wrong communication feedback will bring a wrong response. Of course, we are familiar with defensive responses like, — “It is working on my machine.”, “It must be from another service, go check somewhere else.” , “It didn’t happen when I follow your step to reproduce.”— and something similar. Those reactions could affect the productivity of a company.
As software testers, we don’t want to get a reaction similar to that or even worse, make it. So, what is the better communication approach? How to tell bad news without making any anxiety?
I’m proposing the use of the Situation-Behavior-Impact framework.
What is the Situation-Behavior-Impact framework?
It is a direct, non-judgmental, and widely-recognized model for delivering feedback. Situation-Behavior-Impact or SBI is proven to reduce the anxiety of delivering feedback and also reduce the defensiveness of the recipient.
The Situation-Behavior-Impact method is simple and direct: You capture and clarify the Situation where bugs occur, describe the specific Behaviors observed, and explain the Impact of the behavior of the bug on the software.
How You Can Use Situation-Behavior Impacts to tell bug occurrence?
1. Situation:
Describe the specific situation/environment in which the bug occurred. Avoid generalities, such as “in my browser…, in my machine…” as that can lead to confusion. Often bugs only happen in certain environments so it is good to be as specific as possible. Make sure to list the operating system or browser you are using, and if applicable, which version of software and hardware you are using.
Example: “In Firefox browser version 105.6.1 64 bit…”
2. Behavior:
Describe the actual, observable behavior. Keep to the facts. Avoid using ambiguous terms such as “not working, broken”. Be more specific, write every detail that you can get.
Example: “…When I click the ‘search’ button the browser is not responding.”
But don’t forget to write down the expected behavior.
Example: “…When I click the search button, the item I’m looking for should appear.”
3. Impact:
Describe the results of the behavior. Because you’re describing exactly what happened and explaining the real impact of the bug, a developer will be less likely to feel offended and react positively.
So how to state the impact of bug behavior? You can follow this example.
Example: “…When I click the ‘search’ button the browser is not responding. It causes memory usage to spike sharply.”
The success of the Situation-Behavior-Impact will minimize the negative reaction. If the reaction is positive, then productive cooperation can be continued. And you can resolve the bug along with the software developer rather quickly and with less drama.
Please bear in mind, writing bug reports follows a different format, I will write a format to create bug reports in a different story. This approach is useful to tell bug occurrence in a written form or verbally.
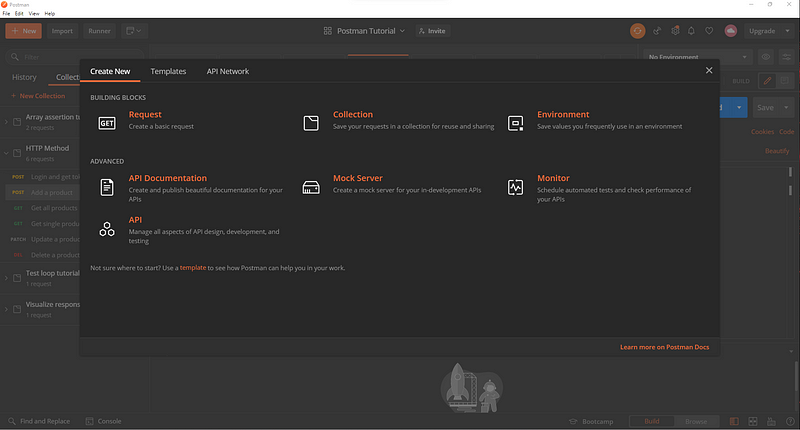
In this article I will show how to create basic request in postman.
Basic Features
Before creating postman request, first let me show you postman basic features. I will show features like
Params — Allows you to add query parameter in request URL
Authorization — It might be basic authentication, bearer token, or just simply username and password
Headers — Where you will write needed header for the request
Body — This is where you put customization values.
Pre-request Script — Executed before running the request. You can add environment variables or test preconditions here.
Tests — This is where you put our assertion script for the test. It is important to add assertion for each request so we know whether the request is succeed or not.
Create Our Request
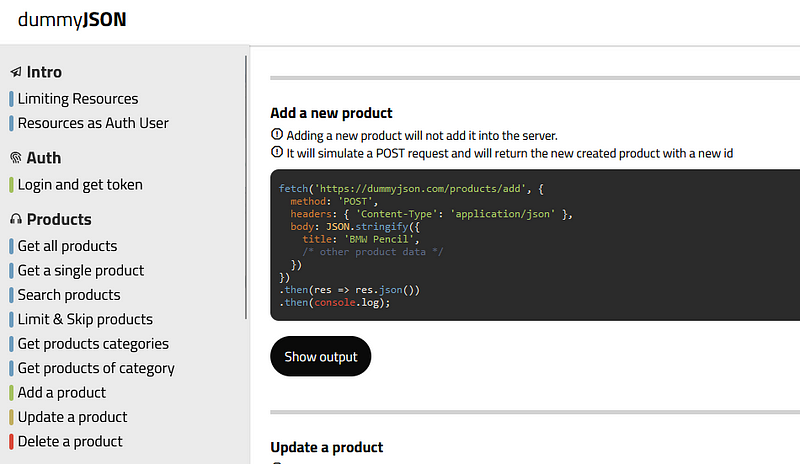
Now after we know Postman’s basic features, we are ready to create our first postman request. For this article’s simulation I will use demo site from dummyjson. You can access the swagger here:
For this simulation I will use endpoint “Add a new product”. This endpoint will simulate POST request and mock a create new product behavior.
Add a new product simulation
Create a Collection to organize our request — Yes we can create single request without a collection, but a collection will help us to make our request more well organized. We also can group our collection into folders under the same category, such as: Setup, Positive Cases, Negative Cases, and Cleanup.
Collection creation
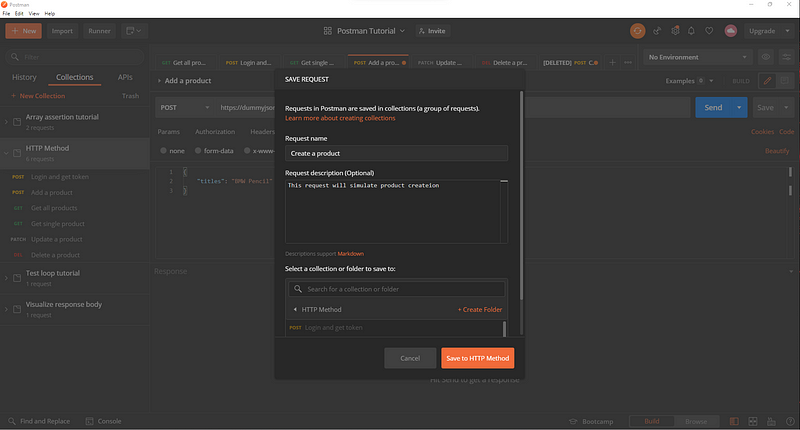
2. Create request — In this step we will create a request. To create a request within a collection, click triple dot from collection then Add Request. Write down Request name and Request description (Optional). Click “Save to HTTP Method”.
Request creation
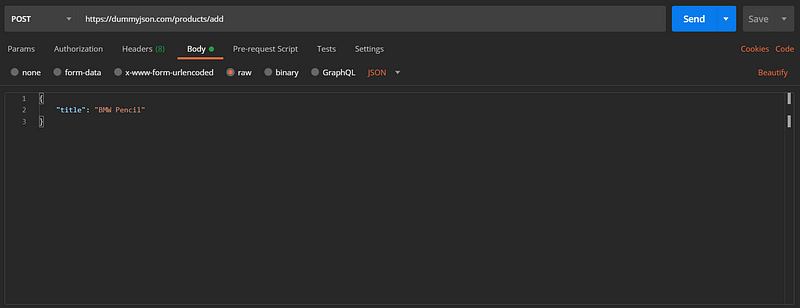
3. After request is created then we are ready to make a postman request.
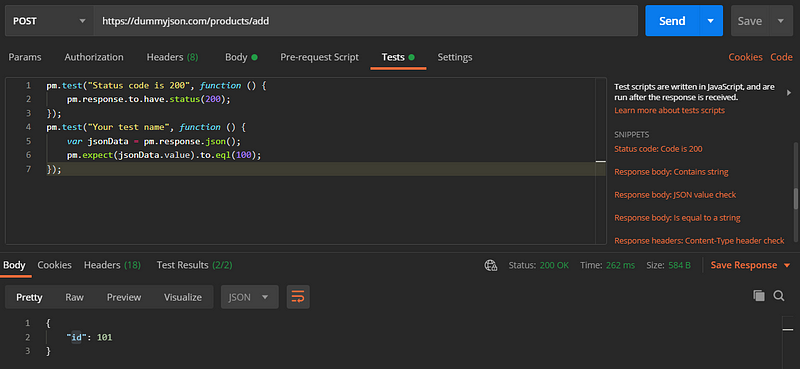
In the body tab click raw as body type and JSON as the format. Then write
{
    “titles”: “BMW Pencil”
}
Request body
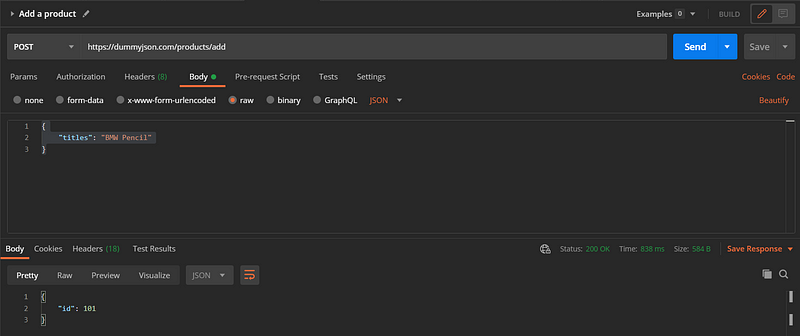
4. Click “Send” button — After this step is executed we already get the result whether fail or success. In this simulation the request return 200 as response code and “id”: 101 as response body.
Request response
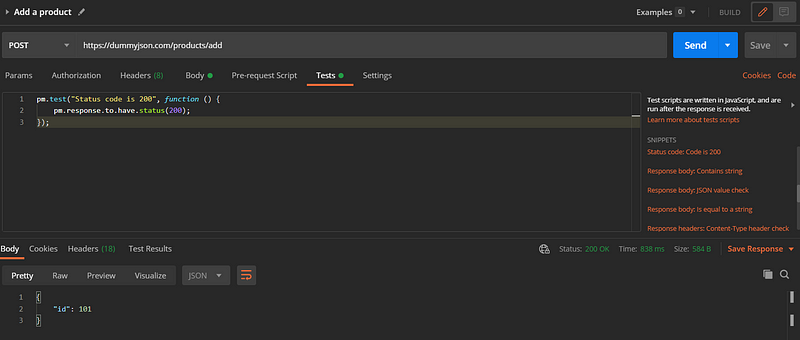
5. Test Assertion — now, after we get the response code and response body, we need to assert the test to assure endpoint returned expected response.
To add assertion, click “Tests” tab
For this simulation, create an assertion using snippets is enough. So move to snippets and choose on of them.
Test Snippets
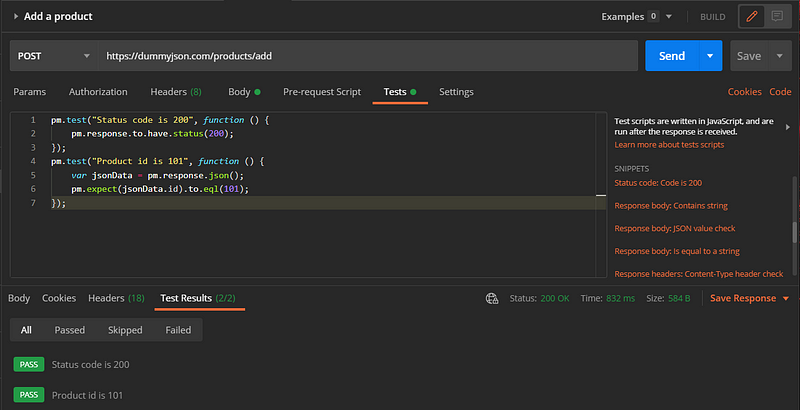
I will assert this request using two snippets, ”Status code is 200" and “Response body: JSON value check”.
Click those snippets. Now we will have two code blocks. The first block is good enough, so we will work on the second block. String “Your test name” can be changed into any string you desire, so I will change it into “Product id is 101”. Because returned Json key is “id” and the value is 101, so we will change “pm.expect(jsonData.value).to.eql(100);” into “pm.expect(jsonData.id).to.eql(101);”
I think it is good enough now. Click “Send” button again.
In the response click “Test Results” and we will get two results ”Status code is 200" and “Product id is 101”. And both of them are PASS. Those results are from previous test block.
That’s how we create basic API test using Postman. This test is simulating positive scenario. Maybe I will write about how to create negative scenario in the next article.
In this tutorial I will share how to assert jwt token in the response body. To simulate API behavior, I will use dummy API server from dummyjson.com. You can access the website using the link below:
[embed]https://dummyjson.com/docs/auth[/embed]
In this simulation, I will use endpoint “Login user and get token”. This endpoint is using POST method. For how to test http method using postman you can follow the instruction from the article below:
[embed]https://dummyjson.com/docs/auth[/embed]
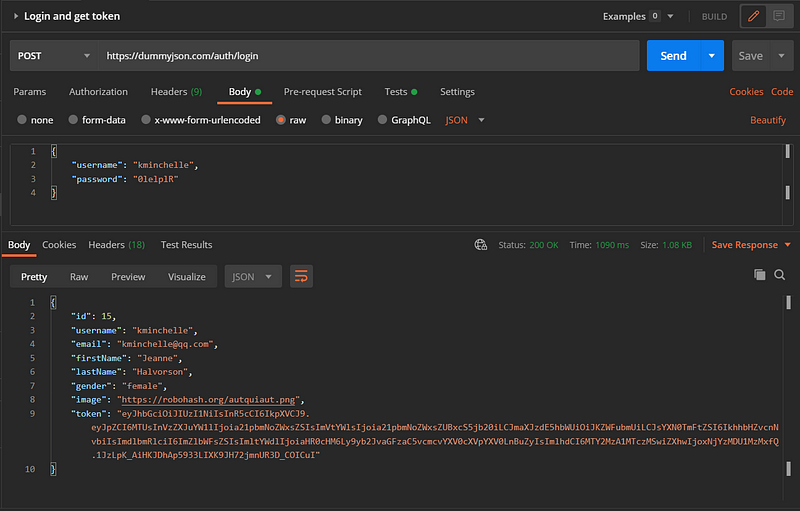
The figure below is the response body for “Login and get token” endpoint. We want to assert the jwt content from “token” field.
Login and get token response body
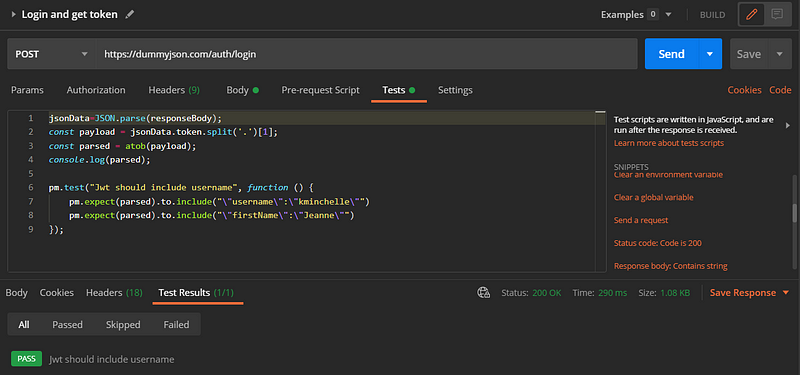
To do that we can use atob(). To use it you can write down the following script in the “Tests” tab.
After we hit send button, postman will return log that contains the jwt content. Then we can assert tho content values.
Postman log
To assert jwt token we can add following test script:
pm.test(“Jwt should include username”, function () {
    pm.expect(parsed).to.include(“\”username\”:\”kminchelle\””)
});
We can assert another field by adding pm.expect script within the pm.test block, for example jwt token should contain field “firstname” with value “Jeanne“. We can add test script as following:
pm.test(“Jwt should include username”, function () {
    pm.expect(parsed).to.include(“\”username\”:\”kminchelle\””)
    pm.expect(parsed).to.include(“\”firstName\”:\”Jeanne\””)
});